If your website has traffic not only from your local country, but also from international visitor. well it's time for you to think to distribute your contents to separate sites on different country. This method's called CDN (Contents Delivery Network), is very useful to decrease a number of hop of network route, from user computer to Contents Server. Let's say we host our website on Indonesia data center. when user from US want to access our website then they has travel about 13 hop until they arrived to server. Compare with Indonesian user that access directly to the server that only took 5 hop. Of course to implement CDN it takes several things to consider, at least this two reasons is something you must prepare of; Server for content distribution and technical person. Thinking of this reason means involving big amount of investment and experienced IT person. But if you don't have both resource, then try to consider by using Cloud Computing such as AWS from Amazon company. You don't need to have an IT person with such specific skill and you only pay as much as your usage. [caption id="attachment_185961" align="aligncenter" width="180" caption="Amazon Web Service"][/caption] And with this few step you can learn to distribute your static files. 1. First step is you should have server for static content with their own domain name. this server would be act as origin server.
eg. if your file named as 'static_file.jpg' and your domain name is 'origin.domaincdn.com' then you should be enable to access the content by accessing this url to your browser:
'http://origin.domaincdn.com/static_file.jpg' or something similar like that.
2. Login to your AWS Amazon Console ( http://aws.amazon.com/console/ ) account then go to Amazon CloudFront service. You can create your first content distribution by clicking on "Create Distribution" button.
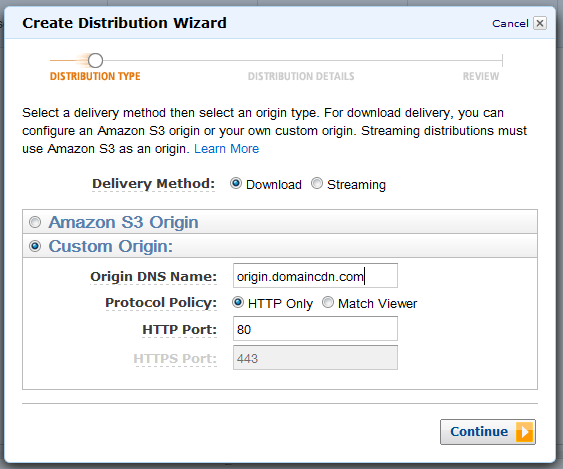
Choose "Download" as your deliver method. Then choose "Custom Origin" if you prefer to host your own contents as an origin server. then fill "Origin DNS Name" field to your domain (eg. origin.domaincdn.com). And fill the rest of the field according to your origin server configuration. click "Continue" button.
[caption id="attachment_185949" align="aligncenter" width="441" caption="CloudFront - Create Distribution"]

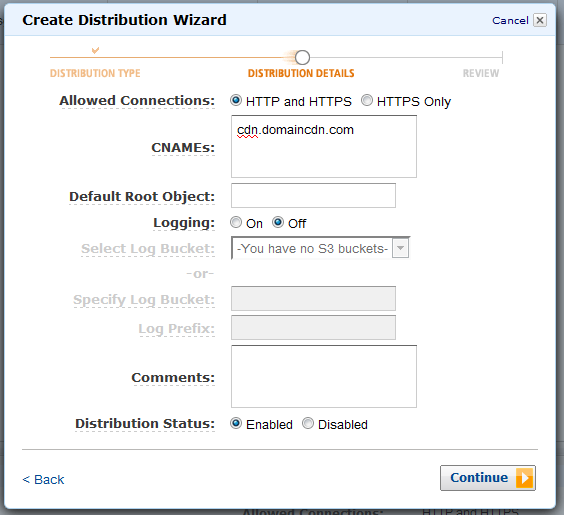
The only field that you must fill in is "CNAMEs" field. This field would be the domain that your application / web would call the static file from CDN ( CloudFront ). let's name it with "cdn.domaincdn.com"
And let others field with their default configuration. click "Continue" button.
[caption id="attachment_185950" align="aligncenter" width="440" caption="AWS CloudFront"]

it takes a moment for amazon to create our Distribution. while waiting this process to finish, we can do our last step which is setup our DNS record.
5. The last step is create CNAME record to our DNS.


